My hiatus from writing about my food obsessions has been too long. We all have ups and downs in life and often get caught up in the downs. I've been able to rekindle all of my intrigue and wonder about food and culture and history and then find ways to experience them all together.
My ideas about cooking are changing and I hope to be able to express myself as much as I can in these entries.
Coming up I'll be posting pictures of the pig I butchered (but not slaughtered), all of the yummy treats I created with it and down the road some more fun projects to advance my ever-growing, self-sufficient life style.
Very soon I'll post a picture of the old Enterprise sausage stuffer I bought at an antique shop for real cheap!
Merry Christmas!
The "Jersey" Girls From Deerfield Farms

Snookie is in the background!
Friday, December 3, 2010
Sunday, April 11, 2010
A Simple Walk With The Dog Turns Into An Inspiring Spring Soup
I am a big fan of all things free...especially food. So I've always been a bit of a forager to keep some sort of hobby outside the kitchen. When I first went to cooking school, I was thoroughly inspired by all of the instructors that would instill in us the benefits and pleasures of eating locally. We would shop at farmers markets as class field trips and look at all of the seasonal produce that was around. These beliefs lead my mind to come to a major question: What could be even better than eating locally from farmers who care? My conclusion was looking for and finding the bounty  that nature offers herself. From that point on I've always made it a point to research plants and fungi that was in my area and seek it out. With much determination and some luck, I have had some real success finding food stuffs. I've always been very cautious about making sure I've identified things properly before I consumed them and never ind into indulge int too many difficult to identify or similar looking things. It's simply not worth the risk, especially with mushrooms!
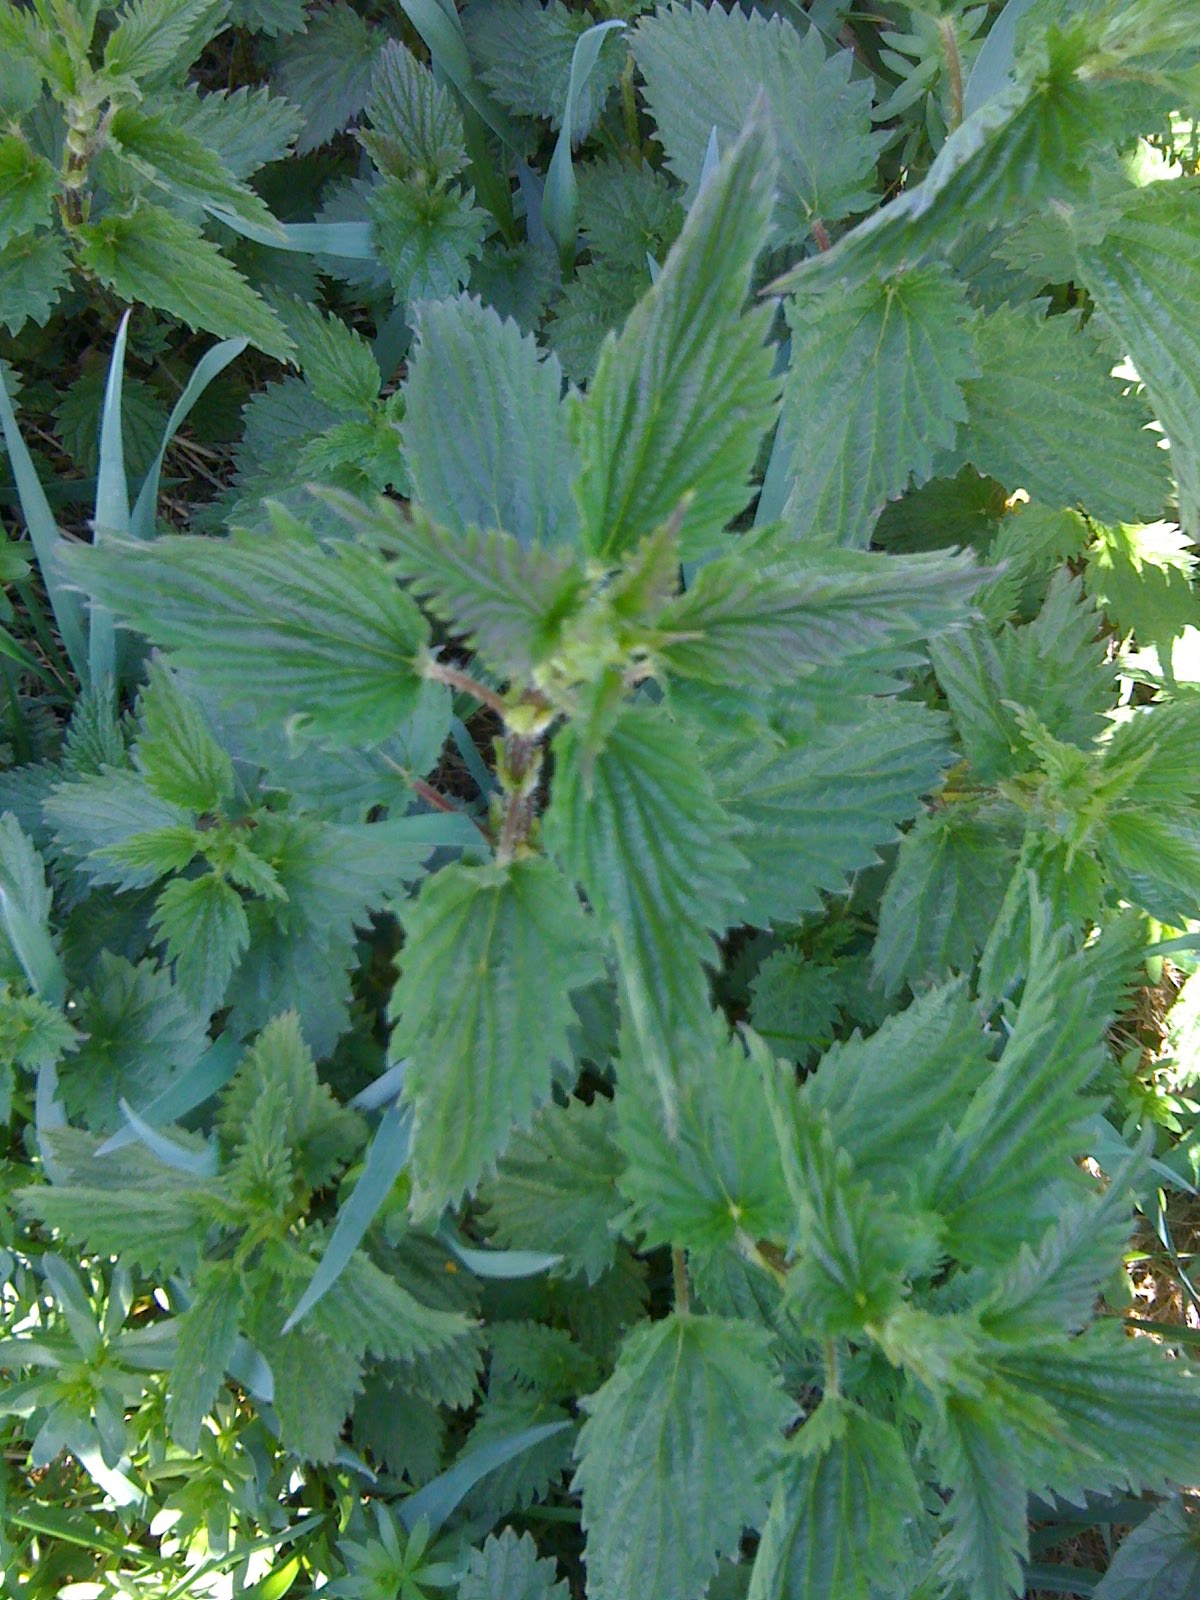
So, today I really wasn't on a mission for wild edibles, although I do always keep an eye out. Especially in the Spring when new things are coming up all the time. I was just getting out to give my dog a walk. I take to our local town "open space", where it's simply just that, open space and lots of shrubbery and growth happening. Plus, my dog loves it with all the new smells and things to stimulate a lab that aren't in our back yard. As I was following a path that was slightly carved out by a recent lawn mowing I looked down at a plant that looked vaguely familiar. I thought for a while and then I decided to take a closer look. I stooped down and examined it and thought it might be a type of mint. Then I noticed the fine little hairs all over it. I found nettles! Stinging nettles to be more precise. When I got back up to my feet I looked around to see a few large patches of them in the area. Then I got quite excited. I knew I was gonna cook something with these things come hell or high water! I went back to the car with Annie (my dog) and I went back home to get the stuff I needed to harvest these little babies. I needed to get some rubber gloves, a little knife and a couple of bags to put them in. I rushed back to go pick them and quickly filled my bag. I had to wear the rubber gloves because of the "STING" from the stinging nettles. They have fine hairs on the leaves but also larger little hairs on the stem that stick you and inject you with a kind of
  formic acid. Kinda like being stung from a fire ant. The sting lasts about 20 minutes or so (for me anyways) and is itchy and a little sore. When I got home I knew exactly where I would find a recipe for nettles. My favorite homesteading-chef-personality of all...Hugh Fearnly Whittingstall. The River Cottage Cookbook is one of my favorites of all-time but I particularly like it for his "hedgerow" foraging and recipes. I found a great nettles recipe for soup which I quickly gathered the ingredients for. I got a new pair of gloves on and cleaned all of the nettles I had and started preparing the soup. In about 25 minutes I had soup! It was quite delicious and was made with some really basic ingredients. I definitely put this up there as a new Springtime ingredient to look out for next year as well. I probably have only a couple of weeks to go before these die off and I'll have to wait for
  next year to do this again. That is one of the beauties of eating seasonally. You have something to look forward to next year and plenty of time to ponder how you could prepare it better the next time. Here's to the nettles of April! Cheers!
 that nature offers herself. From that point on I've always made it a point to research plants and fungi that was in my area and seek it out. With much determination and some luck, I have had some real success finding food stuffs. I've always been very cautious about making sure I've identified things properly before I consumed them and never ind into indulge int too many difficult to identify or similar looking things. It's simply not worth the risk, especially with mushrooms!
So, today I really wasn't on a mission for wild edibles, although I do always keep an eye out. Especially in the Spring when new things are coming up all the time. I was just getting out to give my dog a walk. I take to our local town "open space", where it's simply just that, open space and lots of shrubbery and growth happening. Plus, my dog loves it with all the new smells and things to stimulate a lab that aren't in our back yard. As I was following a path that was slightly carved out by a recent lawn mowing I looked down at a plant that looked vaguely familiar. I thought for
 a while and then I decided to take a closer look. I stooped down and examined it and thought it might be a type of mint. Then I noticed the fine little hairs all over it. I found nettles! Stinging nettles to be more precise. When I got back up to my feet I looked around to see a few large patches of them in the area. Then I got quite excited. I knew I was gonna cook something with these things come hell or high water! I went back to the car with Annie (my dog) and I went back home to get the stuff I needed to harvest these little babies. I needed to get some rubber gloves, a little knife and a couple of bags to put them in. I rushed back to go pick them and quickly filled my bag. I had to wear the rubber gloves because of the "STING" from the stinging nettles. They have fine hairs on the leaves but also larger little hairs on the stem that stick you and inject you with a kind of
  formic acid. Kinda like being stung from a fire ant. The sting lasts about 20 minutes or so (for me anyways) and is itchy and a little sore. When I got home I knew exactly where I would find a recipe for nettles. My favorite homesteading-chef-personality of all...Hugh Fearnly Whittingstall. The River Cottage Cookbook is one of my favorites of all-time but I particularly like it for his "hedgerow" foraging and recipes. I found a great nettles recipe for soup which I quickly gathered the ingredients for. I got a new pair of gloves on and cleaned all of the nettles I had and started preparing the soup. In about 25 minutes I had soup! It was quite delicious and was made with some really basic ingredients. I definitely put this up there as a new Springtime ingredient to look out for next year as well. I probably have only a couple of weeks to go before these die off and I'll have to wait for
  next year to do this again. That is one of the beauties of eating seasonally. You have something to look forward to next year and plenty of time to ponder how you could prepare it better the next time. Here's to the nettles of April! Cheers!
Tuesday, April 6, 2010
My First All-Grain Homebrew

Did you ever have something that you wanted to do for a long time but you kept putting it off. Then once you did finally do it, you were happy you did it, and wondered why you waited so long! Maybe you had a real reason or maybe were just simply too lazy to get started? What ever it was figure it out because its stopping you from getting things done!! Well I postponed making homebrew for quite some time for various reasons. I thought it might be too complicated to figure, I didn't have the proper equipment and I didn't know anyone who was making any all-grain beers already. So I decided to "get 'er done"!
Once I did the research on all the equipment I needed I knew it could take a lot of money to get all I needed to brew. I looked high and low for discounted items as well as put a few "wanted" ads on Craiglist to piece it all together. At the end of the day I still had to pay a fair amount of money just to get my first batch of beer. I did wonder if was worth all this time and effort since I don't drink beer everyday. But, I did the math on all things considered and figured if I make enough beer to supply myself, to drink on special occasions and bring to friends as gifts (if it's good) then the equipment will pay for itself and I'll be ahead financially.
So, with regards to anyone reading, I am just beginning this process of brewing without much help besides some hobby forums on the Internet and a recipe or two, so I won't be providing much advice on how to do it best, just an explanation of how I did it. Also the pictures I've taken will provide a visual guide to some of the steps involved.
Making beer involves four ingredients: barley, hops, yeast and water and that's it. The majority of home-brewers make beer from what's called a malt extract, which is a heavy syrup (of fermentable sugars) made from (malted)barley. It's made by extracting the fermentable sugars from the barley, in solution, and then reducing them to a thick syrup. With homebrewing an all-grain batch of beer you must do that step yourself (except you're not reducing it to a syrup). There is a tricky point to dealing with the barley, though. The majority of the starches in the barley have to be converted to fermentable sugars. The natural enzymes in the barley are capable of doing that, but you have to know what to do to make it happen. To explain it simply, you steep your cracked barley(grains)in 152F water until the enzymes work and convert the remaining starches into sugars. There is a test to see if this happens. Iodine purchased at the pharmacy is an indicator of the presence of starch. It is used by sampling a little of your mash (barley and water mixture) and mixing a few drop into it. If the iodine turns purple then further conversion needs to happen. Which is simply more time at the 152F. Keep testing your mash and once the iodine doesn't react with the starches then they have all converted to fermentable sugars. Next, you strain you liquid off of your barley, which could be a little tricky as well. You have a mixture a barley and water that looks a lots like oatmeal. It's very thick and dense with grains. You have to do what's called sparging, which is a fancy word for washing all the good sugary liquid off of the barley. It's kind of like squeezing your tea bag out to get all of the tea flavor out, except we don't have a bag, so we have to
  wash them over with hot water until all the flavor (sugar) is out. As you are draining off the liquid from the bottom of the grains, you are pouring the hot water over top and pushing all of the heavier liquid to the bottom. When the liquid is too diluted to be effective you are done. At this point the rest of the work is quite easy. You have to boil the liquid to reduce it a bit closer to the size of the batch of beer and to concentrate the sugars more. Once you have your wort (barley liquid) to the proper amount then you add your hops. They are added in at two different times. Bittering hops are added in the beginning and the aroma hops are added at the end. After the hops are cooked to the correct time intervals then you need to cool your wort down to the correct temperature to add your yeast. I used my bath tub filled with cold water. Cool the wort down to about 80F and
  then aerate it (by whisking or simply pour it high into your fermentor) and add the yeast. Pour your wort into your fermentor, which is typically a glass carboy with a tight neck) and cap it off with an airlock. This will keep air out while letting out the carbon dioxide produced by the yeast. I really am over simplifying things a bit right now because I don't have too much explanations to offer. http://www.howtobrew.com/sitemap.html : Here is one of the most informative websites I've seen about homebrewing yet. If you are interested to know a lot more of the science then check it out.
Once I did the research on all the equipment I needed I knew it could take a lot of money to get all I needed to brew. I looked high and low for
 discounted items as well as put a few "wanted" ads on Craiglist to piece it all together. At the end of the day I still had to pay a fair amount of money just to get my first batch of beer. I did wonder if was worth all this time and effort since I don't drink beer everyday. But, I did the math on all things considered and figured if I make enough beer to supply myself, to drink on special occasions and bring to friends as gifts (if it's good) then the equipment will pay for itself and I'll be ahead financially.
So, with regards to anyone reading, I am just beginning this process of brewing without much help besides some hobby forums on the Internet and a recipe or two, so I won't be providing much advice on how to do it best, just an explanation of how I did it. Also the pictures I've taken will provide a visual guide to some of the steps involved.

Making beer involves four ingredients: barley, hops, yeast and water and that's it. The majority of home-brewers make beer from what's called a malt extract, which is a heavy syrup (of fermentable sugars) made from (malted)barley. It's made by extracting the fermentable sugars from the barley, in solution, and then reducing them to a thick syrup. With homebrewing an all-grain batch of beer you must do that step yourself (except you're not reducing it to a syrup). There is a tricky point to dealing with the barley, though. The majority of the starches in the barley have to be converted to fermentable sugars. The natural enzymes in the barley are capable of doing that, but you have to know what to do to make it happen. To explain it simply, you steep your cracked barley(grains)in 152F water until the enzymes work and convert the remaining starches
 into sugars. There is a test to see if this happens. Iodine purchased at the pharmacy is an indicator of the presence of starch. It is used by sampling a little of your mash (barley and water mixture) and mixing a few drop into it. If the iodine turns purple then further conversion needs to happen. Which is simply more time at the 152F. Keep testing your mash and once the iodine doesn't react with the starches then they have all converted to fermentable sugars. Next, you strain you liquid off of your barley, which could be a little tricky as well. You have a mixture a barley and water that looks a lots like oatmeal. It's very thick and dense with grains. You have to do what's called sparging, which is a fancy word for washing all the good sugary liquid off of the barley. It's kind of like squeezing your tea bag out to get all of the tea flavor out, except we don't have a bag, so we have to
  wash them over with hot water until all the flavor (sugar) is out. As you are draining off the liquid from the bottom of the grains, you are pouring the hot water over top and pushing all of the heavier liquid to the bottom. When the liquid is too diluted to be effective you are done. At this point the rest of the work is quite easy. You have to boil the liquid to reduce it a bit closer to the size of the batch of beer and to concentrate the sugars more. Once you have your wort (barley liquid) to the proper amount then you add your hops. They are added in at two different times. Bittering hops are added in the beginning and the aroma hops are added at the end. After the hops are cooked to the correct time intervals then you need to cool your wort down to the correct temperature to add your yeast. I used my bath tub filled with cold water. Cool the wort down to about 80F and
  then aerate it (by whisking or simply pour it high into your fermentor) and add the yeast. Pour your wort into your fermentor, which is typically a glass carboy with a tight neck) and cap it off with an airlock. This will keep air out while letting out the carbon dioxide produced by the yeast. I really am over simplifying things a bit right now because I don't have too much explanations to offer. http://www.howtobrew.com/sitemap.html : Here is one of the most informative websites I've seen about homebrewing yet. If you are interested to know a lot more of the science then check it out.
I am currently waiting for this batch of beer to turn out. After it's ready I'll report back to let you know what it turned out like. I hope it's good but I know as my first one it may very well turn out terrible with off  flavors. But, again, the learning is the fun part and without that it's just not really worth doing so much work.
 flavors. But, again, the learning is the fun part and without that it's just not really worth doing so much work.
Tuesday, March 30, 2010
No Food...No Blog Posts?
As I have just started writing this blog a couple of months ago and if you are reading this you probably know that all of the topics thus far have been about cooking projects from the ground up. When the idea of a new project pops into my head I must pursue it until I reach my goal of a reasonable clone (of what my understanding of the standard is) or I abort and retreat to ponder the next attempts strategy. I must say that I have alot of fun with all attempts regardless.
I haven't completed any projects lately that have been large enough to site but I have been working on piecing together a home-brew kit to make beer in the all-grain method. As I produce my first batch I will share all the in's and out's of the process and the pitfalls that I arise as I experience them. I've made beer with malt extracts before and while the beer is a good outcome, it just doesn't hit the spot for me as far as "ground-up" projects. It's kind of like making koolaid... or something like that. Although there is a certain amount of accuracy (especially sanitation) needed to make extract type beer it's not as crucial as with doing it with all grain. My goal is to make a beverage with the four main ingredients of beer; malted barley, hops, water and yeast. I just thinks it's cool! I'll feel like I've "made" beer even more so than with malt syrup. That post will be coming up soon.
Just a side note for other later blog posts, I will be getting a few chickens in my back yard to provide us with a few eggs to have around the house. It will also help to create the setting for my fantasy of having a smallholding farm, which is most likely not in the cards for me.
Friday, March 5, 2010
Yogurt Is Low Tech and Easier Than You Think.
I eat more yogurt than anyone I know. Maybe 2 or 3 per day and I don't get tired of it. If you add to that the Kefir I drink that would bring me way above the average. You may think that I eat so much because of some fad yogurt diet or all the talk about probiotics and how good they for you, but that's not the case. I just love the stuff!
Yogurt can have various textures from light to very heavy and creamy like Greek style. Greek style yogurt is more or less a strained yogurt that is actually very thick. A lot of the liquid is drained off leaving you with something that's thicker than sour cream. I am a big fan of the sweet kind with fruit on the bottom, since that's what I grew up on, but I also really like making dips and dressings or marinades with it as well. Yogurt makes a great marinade when it's mixed with herbs or curry for things like lamb or chicken. When it's grilled it caramelizes and makes sort of a crust on the surface.
The other day as I was thinking of another way of making an everyday item I would normally buy at the store, I thought I'd try to make yogurt in the most low-tech way as possible. Armed with only two 6 oz yogurts and a gallon of raw milk I thought I'd give it a go. After a little research on finding the prime temperature range for culture growth I then stumbled upon the one of the coolest ways of incubating without any extraordinary equipment. I took a large IGLOO cooler from the basement and washed it out just to make sure I was working clean. I was gonna use the "cooler" as a "warmer" instead. The insulation works perfectly to hold the necessary temperature of the milk while the cultures are working. The process takes about 6-7 hours.(Don't quote me on that length of time, you should see for yourself. I left the yogurt to set while I went to work.) The one essential part of which I read in the book "On Food and Cooking" by Harold McGee was the heating of the milk. His description of it is that "the milk can be heated to 185F for 30 minutes or 195F for 10 minutes". "Th[is] treatment improves the consistency of the yogurt by denaturing the whey protein lactoglobulin, whose otherwise nonreactive molecules then participate by clustering on the surface of the casein particles. With the helpful interference of the lactoglobulins, the casein particles can only bond to each other in a few spots, and so gather not in clusters but in fine matrix of chains that is much better at retaining liquid in its small interstices." Here is this link to read on yourself: http://books.google.com/books?id=oWqlY5vEafIC&lpg=PP1&dq=harold%20mcgee%20on%20food%20and%20cooking&pg=PA48#v=onepage&q=&f=true
This heat treatment will give you a smooth texture to your yogurt. If you want an even thicker yogurt you can add some dry milk powder to increase the protein and make it more dense.
So just to give you the correct procedure, I'll start from the beginning...
Procedure:
1 Gallon of Milk (unpasteurized)
2 (6 oz) containers of plain yogurt (With Live and Active cultures. This you can read on the side of the container)
1 gallon Pot
1 large Insulated Cooler
A Thermometer that read up to 212F
Containers you want to fill with yogurt and covers.
- Open the 2 yogurts and them with whisk 2 cups of the milk
- Pour the rest of the milk into the pot and set it onto a medium high burner to warm. Heat milk up to 195F, hold it for 10 minutes and then remove it. To prevent the milk from scorching on the bottom of the pan, whisk it very frequently and
- Thoroughly cool the milk down to 125F.
- When it's ready, add the yogurt and milk mixture and whisk it well.
- Get hot water from your tap (about 135F will do) and pour it into the cooler.
- Pour your milk mixture into your container and cover.
- Set your containers into the cooler with the warm water being sure the water does not come too close to the lids. If so take out some of the water.
- Close the lid and let it ferment until the yogurt is set. About 6-7 hours.
That is really all you have to do. You can make all the yogurt you want just by buying a couple extra plain ones when you shop! After you make your first one you can continue to make more as long as you save 2 cups of your last batch. Yogurt can get expensive, costing $5.00 for 4 6-oz containers, if it's not on sale. You can make a ton more for that much and choose what goes into it. Save some of your money by making your own yogurt so you can spend it on other things that you can't make yourself.
Saturday, February 20, 2010
The Maple Season Is Officially Here...
This is such an exciting time of year for me. I always feel that we've turned the corner on Winter, and then full speed ahead towards Spring, when the maple sap is flowing. This is the  time during the winter when I fell like I have something to do out side and am being a little productive. I know making maple syrup is not one of life's priorities, like being sure I take care of stuff around the house or doing laundry, but for me it's important for creating a more fulfilling life overall. I find that projects like this, be it big or small are, believe or not, empowering. With accomplishing these sorts of projects so comes the confidence that I can do much bigger and better things as well. As far as be empowering, building some aptitude towards self sufficiency and experiencing a glimpse of freedom from status quot living that most people live, is how being skilled in creating everyday things makes that happen. I also don't want to be ignorant in certain basic life skills which, if analyzed, teach me lessons such as how to be patient or when to
  cut my losses. To develop such things as cognitive and concrete skills, to problem solve and producing for my family and do any other things I find satisfying in life, all this adds up to overall fulfillment and personal growth.
I had posted previously about maple syrup making and pretty much all the basics you need to know about making your own. I tapped my trees about four days ago and the weather has been perfect for the sap to flow. I was a little aggressive, though, when it came to putting two taps on each tree because trees should be over 24 inches in diameter to have two taps, but I think they'll survive just fine. Call me selfish but I just had to get more sap this year! The sap flowed pretty good over the last couple of days, and still is now, but I just had to get some cooking this today no matter what. I think it will take a couple of more hours to finish and I'll post a picture of the finished product when I have it. The pictures I have uploaded are my set up today. You can see the Sapsacs hung on the trees and then you can see my two pots simmering away outside. I have wood from a few years ago that I need to use up before it rots so I started with that. I also pulled out the propane burner to help things along a little faster. Boy, I can't wait to try some of this syrup!

 time during the winter when I fell like I have something to do out side and am being a little productive. I know making maple syrup is not one of life's priorities, like being sure I take care of stuff around the house or doing laundry, but for me it's important for creating a more fulfilling life overall. I find that projects like this, be it big or small are, believe or not, empowering. With accomplishing these sorts of projects so comes the confidence that I can do much bigger and better things as well. As far as be empowering, building some aptitude towards self sufficiency and experiencing a glimpse of freedom from status quot living that most people live, is how being skilled in creating everyday things makes that happen. I also don't want to be ignorant in certain basic life skills which, if analyzed, teach me lessons such as how to be patient or when to
  cut my losses. To develop such things as cognitive and concrete skills, to problem solve and producing for my family and do any other things I find satisfying in life, all this adds up to overall fulfillment and personal growth.
I had posted previously about maple syrup making and pretty much all the basics you need to know about making your own. I tapped my trees about four days ago and the weather has been perfect for the sap to flow. I was a little aggressive, though, when it came to putting two taps on each tree because trees should be over 24 inches in diameter to have two taps, but I think they'll survive just fine. Call me selfish but I just had to get more sap this year! The sap flowed pretty good over the last couple of days, and still is now, but I just had to get some cooking this today no matter what. I think it will take a couple of more hours to finish and I'll post a picture of the
 finished product when I have it. The pictures I have uploaded are my set up today. You can see the Sapsacs hung on the trees and then you can see my two pots simmering away outside. I have wood from a few years ago that I need to use up before it rots so I started with that. I also pulled out the propane burner to help things along a little faster. Boy, I can't wait to try some of this syrup!
Sunday, February 14, 2010
Coffee: To Roast... or Pop?
There's nothing like a good cup of coffee. Judging from today's culture I'm not the only one who feels this way. Honestly, I'd say that just about one out of five people out and about are either drinking coffee, on their way to get a cup or are just thinking about the next one. I certainly fall into one of those categories. A coffee culture has taken hold of the country and for me I think I know how it's taken hold.
I can think back to when I was very young and my great-grandmother lived the next floor down from us. Among being spoiled with all the sweets and loving gifts a grandmother will always try to sneak past your mother, mine also snuck a little coffee past her as well. I was always interested in grandmas enthusiasm for opening a new can of coffee. As soon as the lid would come off she would tell me to take a sniff and then she would explain what was good about it. How it smelled so good and that was just the way coffee should be before you brewed it. Then I was fascinated by the percolator. I remember how she would put the grounds in the top cup, fill the bottom with water and then set it on the stove. As soon as it boiled, I would watch the coffee bubble up through the glass handle on the lid, and when it no longer appeared it was done. My grandmother liked her coffee light and sweet. When I say light, I mean she put heavy cream in her coffee! Then she would make it sweet, but not too sweet like today's D&D six-count-sugar coffees, but just enough for the perfect bitter, sweet and creamy balance. When I first tried that coffee I was hooked! It was so much better than the Swiss Miss cocoa I was used to drinking. Grandma wouldn't let me have a full cup of coffee right from the start, she would just give me sips until I was old enough, maybe around 10 or 11 years old. (Back in the early 80's that was old enough I guess.) That was enough for me for coffee to set it's teeth in good and deep. As I got older, coffee with grandma became something very cherished and something I reflected on as good moments with her. Yeah coffee, just like other somewhat more meaningful relics in life, can have great meaning if attached to love and family. As the years went on and grandma got older, her techniques for making coffee changed from percolator to instant and dairy went from heavy cream to half and half. No matter how she made her coffee towards the end it was always perfect to me.
I tell this story to bring into light the associations that I have with coffee and how they are what really make it so much more enjoyable. I think most people are like that as well. Whether their associations are just being social or as important as setting the pace for their day. Their kinship with coffee is always much more than a mere drink. It's more like a relationship that is one-sided and not only reliable but dependable. Yes coffee drinkers are fanatics, to some extent to the coffee but also, I think, to the associations and feeling that it conjures up. Over and over it's an enjoyable experience.
Recently, I thought I was pretty smart having an idea on how I could roast my own coffee at home. Coffee is about 3 times cheaper if bought as whole green coffee beans. I realized that coffee roasters toss coffee around while it roasts like my air-pop popcorn maker does with popcorn. So I thought I'd give it a try. I checked my theory on the Internet and sure enough tons of people do it and, not to mention, everyone is selling popcorn machines on eBay as "Popcorn Popper/Coffee Roaster". So, feeling not as smart as before, I continued with the project. I shopped around at all the retail stores and then realized I often see air-pop popcorn machines at the Goodwill store for about $3-$4. I picked one up that was a Presto Poplite (1440 watts) and brought it home to start roasting. I found a local coffee company that sells green beans in 5 pound bags and picked up a blend. The cheaper, the better for starting projects like this. I followed the instructions of the popcorn machine and filled it with just a half a cup of beans. I plugged it in and watched what happened. The machine was a little sluggish blowing the beans around but a few shakes helped move things along. As it kept going the skins of the beans began to blow off so I put a bowl underneath to catch it.(see picture) The beans start popping and little divots fly
  off of the beans as they get closer to being done. (see picture on right on the paper towel) I simply shut the machine off when I thought it was dark enough for my taste. That was it! It was very easy. I'm sure there are a whole slew of techniques to roasting coffee that are much more accurate and with better tasting results but for the amount of investment I put into it what could I expect. I got a perfectly good coffee with my technique and I dare any standard coffee drinker to tell me it's not as good as any big company's. I like the fact that I could roast as much coffee as I need for the week. That is the best quality coffee you can get, one that is freshly roasted and ground just before being brewed. Maybe one day I can tinker around and make something a little more high-tech but for now I like the ingenuity of using something meant for one purpose, yet used for another. I would encourage anyone out there who is into being self-sufficient and wants to save a little money to give this a try. It's amazing how much money you could spend on coffee at Starbucks if you buy it every day. So do yourself a favor and get the only two things you need: an air-pop popcorn machine and some green coffee beans and get roasting... or do I mean popping.

Just for some additional information, shop on eBay for green coffee beans. I bought a 3 pound bag of green beans for $6.99 plus shipping. Shipping costs suck but it was still cheaper than buying it from my local coffee company.
I can think back to when I was very young and my great-grandmother lived the next floor down from us. Among being spoiled with all the sweets and loving gifts a grandmother will always try to sneak past your mother, mine also snuck a little coffee past her as well. I was always interested in grandmas enthusiasm for opening a new can of coffee. As soon as the lid would come off she would tell me to take a sniff and then she would explain what was good about it. How it smelled so good and that was just the way coffee should be before you brewed it. Then I was fascinated by the percolator. I remember how she would put the grounds in the top cup, fill the bottom with water and then set it on the stove. As soon as it boiled, I would watch the coffee bubble up through the glass handle on the lid, and when it no longer appeared it was done. My grandmother liked her coffee light and sweet. When I say light, I mean she put heavy cream in
 her coffee! Then she would make it sweet, but not too sweet like today's D&D six-count-sugar coffees, but just enough for the perfect bitter, sweet and creamy balance. When I first tried that coffee I was hooked! It was so much better than the Swiss Miss cocoa I was used to drinking. Grandma wouldn't let me have a full cup of coffee right from the start, she would just give me sips until I was old enough, maybe around 10 or 11 years old. (Back in the early 80's that was old enough I guess.) That was enough for me for coffee to set it's teeth in good and deep. As I got older, coffee with grandma became something very cherished and something I reflected on as good moments with her. Yeah coffee, just like other somewhat more meaningful relics in life, can have great meaning if attached to love and family. As the years went on and grandma got older, her techniques for making coffee changed from percolator to instant and dairy went from heavy cream to half and half. No matter how she made her coffee towards the end it was always perfect to me.
I tell this story to bring into light the associations that I have with coffee and how they are what really make it so much more enjoyable. I think most people are like that as well. Whether their associations are just being social or as important as setting the pace for their day. Their kinship with coffee is always much more than a mere drink. It's more like a relationship that is one-sided and not only reliable but dependable. Yes coffee drinkers are fanatics, to some extent to the coffee but also, I think, to the associations and feeling that it conjures up. Over and over it's an enjoyable experience.
Recently, I thought I was pretty smart having an idea on how I could roast my own coffee at
 home. Coffee is about 3 times cheaper if bought as whole green coffee beans. I realized that coffee roasters toss coffee around while it roasts like my air-pop popcorn maker does with popcorn. So I thought I'd give it a try. I checked my theory on the Internet and sure enough tons of people do it and, not to mention, everyone is selling popcorn machines on eBay as "Popcorn Popper/Coffee Roaster". So, feeling not as smart as before, I continued with the project. I shopped around at all the retail stores and then realized I often see air-pop popcorn machines at the Goodwill store for about $3-$4. I picked one up that was a Presto Poplite (1440 watts) and brought it home to start roasting. I found a local coffee company that sells green beans in 5 pound bags and picked up a blend. The cheaper, the better for starting projects like this. I followed the instructions of the popcorn machine and filled it with just a half a cup of beans. I plugged it in and watched what happened. The machine was a little sluggish blowing the beans around but a few shakes helped move things along. As it kept going the skins of the beans began to blow off so I put a bowl underneath to catch it.(see picture) The beans start popping and little divots fly
  off of the beans as they get closer to being done. (see picture on right on the paper towel) I simply shut the machine off when I thought it was dark enough for my taste. That was it! It was very easy. I'm sure there are a whole slew of techniques to roasting coffee that are much more accurate and with better tasting results but for the amount of investment I put into it what could I expect. I got a perfectly good coffee with my technique and I dare any standard coffee drinker to tell me it's not as good as any big company's. I like the fact that I could roast as much coffee as I need for the week. That is the best quality coffee you can get, one that is freshly roasted and ground just before being brewed. Maybe one day I can tinker around and make something a little more high-tech but for now I like the ingenuity of using something meant for one purpose, yet used for another. I would encourage anyone out there who is into being self-sufficient and wants to save a little money to give this a try. It's amazing how much money you could spend on coffee at Starbucks if you buy it every day. So do yourself a favor and get the only two things you need: an air-pop popcorn machine and some green coffee beans and get roasting... or do I mean popping.
Just for some additional information, shop on eBay for green coffee beans. I bought a 3 pound bag of green beans for $6.99 plus shipping. Shipping costs suck but it was still cheaper than buying it from my local coffee company.
Thursday, February 4, 2010
Mozzarella: So Much Trouble...But So Much Fun!
All throughout my years in the culinary world I've heard so many people talk about making fresh mozzarella cheese "in-house" and how easy it was to accomplish. Yet I had never snagged a opportunity to get involved with this process. When ever I spoke with people about how they went about making it I always received a similar answer like, "Just take the curds and pour hot water over them and then stretch it until it's long and stringy and there you have it, mozzarella." That didn't explain much. I had many more questions like: Where do you get the curds? Don't you have to make them yourself? What kind of curds? How hot is the water? Plus, a whole slew of other queries rolling around in my mind.
Now just about a couple of days ago I thought I'd start my research and put this mozzarella thing to bed, finally. I looked online (where else am I gonna look, the library?) for all the information I could find. My first few hits were, just as all those I questioned in the past said, about just getting the curds and stretching them. This did not sit well with me. I wanted to MAKE the curds as well. It seemed like cheating to not make the curds yourself. It's like buying a flavored syrup and adding club soda and saying you made a soft drink. You didn't MAKE anything. you just put two pre-made thing together. The way I like to work is from the true step one. If I had a cow that would be the REAL step one in this process but I don't. Not yet, anyways. I know I have the brains and can figure out most things food related and this seemed pretty easy, especially going by all the information out there on the Internet. I was a bit concerned about wasting a bunch of milk in the process but I wasn't gonna make mozzarella from some schwag milk from the A&P. I was gonna get the raw milk from my local dairy and that cost about $7.00 per gallon. But, for the sake of learning, I feel it's worth it. When I first looked into it I wanted to do it with what I had in the house already, but that was quickly dispelled because I didn't have rennet lying around. That I had to get at the home brew store and it was pretty cheap. (I think $7.00 for 8 tablets) The only other things I needed was some citric acid, (got that with a lemon right?....Nope! That didn't work...more on that later) salt, and the equipment. Which is a stainless steel pot, thermometer, a colander and a bowl or two. That's it!
Now I found a recipe on line using a gallon of milk. That was perfect! So I followed the recipe and got all of my ingredients together, except the citric acid. I juiced a lemon and used that instead. I followed the recipe all the way, keeping the temperatures accurately, and it looked beautiful. Everything happened just like the recipe said it would. When I drained off the curds I noticed a lot of whey coming out. But, I hadn't made this before so I thought it was normal. I followed the procedure with the warm water and tried to stretch the curds. They just kept pushing out more whey and got tighter and tighter. There was just no way they were gonna stretch. It kept breaking up and pushing out more liquid. Also, when I ate them they were "squeaky" when chewed. So I figured this project was over. The very next day I made another batch, with the same $7.00 per gallon milk, and used cider vinegar instead of the lemon juice. The same result happened again. Now I felt like a huge failure. Like I didn't do enough homework and I was paying for it. That turned out o be true. I looked on line some more and searched the significance of the citric acid in the making of the curds. This is one of the most important steps to mozzarella making. I read that the citric acid helps the stretching of the curds. I haven't figured out exactly what it does but I will post it as soon as I find out. So when I tried to replace the pure citric acid with lemon juice or vinegar I didn't lower the pH of the curds enough. So for my third
 attempt I decided to try and find some citric acid. Believe it or not I tried a local pharmacy and they had it. It's kind of expensive when you're buying it for the first time but a little goes a long way. Now I had absolutely everything I needed for the recipe. I followed the directions and added the 1 1/2 tsp of citric acid this time. After the I got the the part of draining off the curds they looked a little different. They looked whiter softer and felt more supple to the touch. I felt like I was in a much better place than before. I then went on to pour the hot water over the curds and they were got soft and stretchy. I was so happy!! Pulling them was a no-brainer. Just have fun and stretch them out. As I was pulling I noticed the more I pulled the more the liquid would come out of the curds. Note to self... go easy on 'em. Don't pull and pull too much. Just get the curds to all go in the same direction and stop. I then used scissors to snip off the size pieces in wanted and shaped them. Shaping is a difficult thing to describe so I would recommend finding a video on YouTube and checking it out for yourself. My end result was a nice ball of mozzarella that was pretty good. Not great, but pretty good. It turned out a little too firm for my liking. I want the mozzarella to be very tender when I cut it. Mine was a texture between fresh mozzarella and the kind you would grate for your pizza. I'm still gonna use it where ever I can because, damn, I made mozzarella! The other great thing about this project is the learning. You can't imagine all the things you learn and, then ponder, from after you go through it all. Lots of fun.
Here is the recipe I wrote after I made my first successful (as I see it) batch.

Ingredients:
1 gallon raw milk
1 1/2 tsp citric acid
1/4 tablet of vegetable rennet
1/4 cup water (non-chlorinated, distilled or just well water at room temperature)
sea salt
Equipment
6-8 qt stainless steel pot
Thermometer
colander or large strainer
cheese cloth (optional)
2 or 3 mixing bowls
Procedure:
1. Slowly heat milk to 60 to 70F. Sprinkle in the citric acid and distribute it evenly (Keep stirring until you don't feel any more crystals on the bottom of the pan).
2. Mix the rennet with the water, well and set aside.
3. Bring the milk up to 88F and add the rennet. Pull the pot off the stove and allow the curds to set. (Should take around 5 minutes or so.)
4. Bring a pot of about 6 cups of water to a simmer and then hold it at about 170F. Add the sea salt to taste.
5. When the curd is fully set, cut the curds into 1/2" cubes and then again at the diagonal. Let the curds sit for about 10 minutes. This will help release some of the whey from the curds.
6. Lift the curds off with a slotted spoon and place into the colander or strainer (this is where the optional cheese cloth is used to line the colander). Save about 4 cups of whey for storage. Allow the curds to drain until the curds start coming together into one large mass. (You can gently move them around if pockets of whey are still left on top)
7. Gently put the curds in a large steel or glass bowl. Continue to pour off any whey if it appears. Pour enough of the hot, salted water over the curds to cover them by an inch or so.
8. Allow the curds to soften significantly! When the curds are very soft and pliable, remove them and begin the pulling process.
9. (I feel, the less you stretch the curds the softer the mozzarella will be. What I've noticed is that as you're pulling your curds more and more liquid or whey is being pushed out of them. This turns into a drier, firmer cheese.)
10. When your curds are stringy and flow in the same direction you can begin to make the size balls you want. (I used scissors to snip off the sizes I wanted.)
11. Shape your cheese into balls by pulling the outside and tucking underneath and pushing back into the center again. You're looking for a smooth surface with a lice round shape.
Now just about a couple of days ago I thought I'd start my research and put this mozzarella thing to bed, finally. I looked online (where else am I gonna look, the library?) for all the information I could find. My first few hits were, just as all those I questioned in the past said, about just getting the curds and stretching them. This did not sit well with me. I wanted to MAKE the curds as well. It seemed like cheating to not make the curds yourself. It's like buying a flavored syrup and adding club soda and saying you made a soft drink. You didn't MAKE anything. you just put two pre-made thing together. The way I like to work is from the true step one. If I had a cow that would be the REAL step one in this process but I don't. Not yet, anyways. I know I have the brains and can figure out most things food related and this seemed pretty easy, especially going by all the information out there on the Internet. I was a bit concerned about wasting a bunch of milk in the process but I wasn't gonna make mozzarella from some schwag milk from the A&P. I was gonna get the raw milk from my local dairy and that cost about $7.00 per gallon. But, for the sake of learning, I feel it's worth it. When I first looked into it I wanted to do it with what I had in the house already, but that was quickly dispelled because I didn't have rennet lying around. That I had to get at the home brew store and it was pretty cheap. (I think $7.00 for 8 tablets) The only other things I needed was some citric acid, (got that with a lemon right?....Nope! That didn't work...more on that later) salt, and the equipment. Which is a stainless steel pot, thermometer, a colander and a bowl or two. That's it!
Now I found a recipe on line using a gallon of milk. That was perfect! So I followed the recipe and got all of my ingredients together, except the citric acid. I juiced a lemon and used that instead. I followed the recipe all the way, keeping the temperatures accurately, and it looked beautiful. Everything happened just like the recipe said it would. When I drained off the curds I noticed a lot of whey coming out. But, I hadn't made this before so I thought it was normal. I followed the procedure with the warm water and tried to stretch the curds. They just kept pushing out more whey and got tighter and tighter. There was just no way they were gonna stretch. It kept breaking up and pushing out more liquid. Also, when I ate them they were "squeaky" when chewed. So I figured this project was over. The very next day I made another batch, with the same $7.00 per gallon
 milk, and used cider vinegar instead of the lemon juice. The same result happened again. Now I felt like a huge failure. Like I didn't do enough homework and I was paying for it. That turned out o be true. I looked on line some more and searched the significance of the citric acid in the making of the curds. This is one of the most important steps to mozzarella making. I read that the citric acid helps the stretching of the curds. I haven't figured out exactly what it does but I will post it as soon as I find out. So when I tried to replace the pure citric acid with lemon juice or vinegar I didn't lower the pH of the curds enough. So for my third
 attempt I decided to try and find some citric acid. Believe it or not I tried a local pharmacy and they had it. It's kind of expensive when you're buying it for the first time but a little goes a long way. Now I had absolutely everything I needed for the recipe. I followed the directions and added the 1 1/2 tsp of citric acid this time. After the I got the the part of draining off the curds they looked a little different. They looked whiter softer and felt more supple to the touch. I felt like I was in a much better place than before. I then went on to pour the hot water over the curds and they were got soft and stretchy. I was so happy!! Pulling them was a no-brainer. Just have fun and stretch them out. As I was pulling I noticed the more I pulled the more the liquid would come out of the curds. Note to self... go easy on 'em. Don't pull and pull too much. Just get the curds to all go in the same direction and stop. I then used scissors to snip off the size pieces in wanted and shaped them. Shaping is a difficult thing to describe so I would recommend finding a video on YouTube and checking it out for yourself. My end result was a nice ball of mozzarella that was pretty good. Not great, but pretty good. It turned out a little too firm for my liking. I want the mozzarella to be very tender when I cut it. Mine was a texture between fresh mozzarella and the kind you would grate for your pizza. I'm still gonna use it where ever I can because, damn, I made mozzarella! The other great thing about this project is the learning. You can't imagine all the things you learn and, then ponder, from after you go through it all. Lots of fun.
Here is the recipe I wrote after I made my first successful (as I see it) batch.

Ingredients:
1 gallon raw milk
1 1/2 tsp citric acid
1/4 tablet of vegetable rennet
1/4 cup water (non-chlorinated, distilled or just well water at room temperature)
sea salt
Equipment
6-8 qt stainless steel pot
Thermometer

colander or large strainer
cheese cloth (optional)
2 or 3 mixing bowls
Procedure:
1. Slowly heat milk to 60 to 70F. Sprinkle in the citric acid and distribute it evenly (Keep stirring until you don't feel any more crystals on the bottom of the pan).
2. Mix the rennet with the water, well and set aside.
3. Bring the milk up to 88F and add the rennet. Pull the pot off the stove and allow the curds to set. (Should take around 5 minutes or so.)

4. Bring a pot of about 6 cups of water to a simmer and then hold it at about 170F. Add the sea salt to taste.
5. When the curd is fully set, cut the curds into 1/2" cubes and then again at the diagonal. Let the curds sit for about 10 minutes. This will help release some of the whey from the curds.
6. Lift the curds off with a slotted spoon and place into the colander or strainer (this is where the optional cheese cloth is used to line the colander). Save about 4 cups of whey for storage. Allow the curds to drain until the curds start coming together into one large mass. (You can gently move them around if pockets of whey are still left on top)
7. Gently put the curds in a large steel or glass bowl. Continue to pour off any whey if it appears. Pour enough of the hot, salted water over the curds to cover them by an inch or so.

8. Allow the curds to soften significantly! When the curds are very soft and pliable, remove them and begin the pulling process.
9. (I feel, the less you stretch the curds the softer the mozzarella will be. What I've noticed is that as you're pulling your curds more and more liquid or whey is being pushed out of them. This turns into a drier, firmer cheese.)
10. When your curds are stringy and flow in the same direction you can begin to make the size balls you want. (I used scissors to snip off the sizes I wanted.)
11. Shape your cheese into balls by pulling the outside and tucking underneath and pushing back into the center again. You're looking for a smooth surface with a lice round shape.

Saturday, January 30, 2010
Quick Marmalade Recipe
Let me address my mispelling of MARMALADE first. I always have a problem with that second syllable sound of a word and I just guessed. I should have spell-checked before posting. Well lesson learned! I thought I'd offer the exact recipe for the marmalade I made last post. Although, you should know, there aren't many ingredients nor exact amounts. The thing is that there's only technique and ratio involved and that's pretty much it. It's much more of an old fashioned way of cooking and I think I found this technique from one of my old cookbooks around the house. So just to commit to a recipe and in recipe format here it is:
Yield: a little over a pint (about 20oz)
1 pound clementines
1 pound sugar
1 lemon (juice only)
water as needed
Procedure:
Yield: a little over a pint (about 20oz)
1 pound clementines
1 pound sugar
1 lemon (juice only)
water as needed
Procedure:
- Put a plate in the freezer. This will make sense later in the recipe.
- Thinly slice your clementines. When it comes to the ends lay them flat and cut them into julienne.
- Put all of the clementines in a larger pot than you may think you may need. Preferably a heavy bottomed pot.
- Cover them by about 2-3 inches of cold water. Bring just to a boil and drain them off.
- Repeat step 3 two more times.
- After the last boil, add the clementines back to the pot with the sugar, lemon juice and enough water to cover by about 1 inch this time.
- Bring it to a boil and then reduce the heat to a low simmer. The low simmer is much more important as the marmalade gets closer to the end of cooking and gets very thick. Be very careful not to scorch it! That sugar is just dying to turn to caramel on you!
- When the marmalde is very thick and the bubbles are getting bigger and shiny keep your eye on it because it's pretty close to being done.
- Pull that plate from the freezer and test your marmalade. Put a little teaspoon on the plate and let it cool all the way. Tip your plate to the side and see if it flows at all. If it runs right down the plate, keep cooking. If it stays put and just tilts a little, look for it to form a little skin that then wrinkles as it tilts. When you hit that stage your done!
- Put it in the refrigerator or process it into a jar(s).
***Note: This recipe will pretty much work with any type of citrus fruit including grapefruits and kumquats.
Friday, January 29, 2010
Cold Morning with Fruit and Jars
It's about 15-20F outside with a wind chill of below zero. That's just a little to cold to take the  dog for a long walk. Sorry Annie! What I need is some more coffee and some stuff simmering on the stove. When I know I have a good excuse to stay inside I am gonna cook, pickle, can, dry or vacuum pack anything I can. It's just in my nature! Today I stared at one of those wooden boxes of clementines on the counter and said "what am I gonna do with these things?". I know my wife will eventually eat them all but who knows when that would happen and I wanted to cook something. I had 4 more jars on the porch that needed to be filled with something and those clementines were in my crosshairs. I was thinking of making a marmelade. After all, people all over the world are harvesting citrus this time of year and making marmelade so I thought that was as good enough reason as any.
  Sorry honey we can buy more! By the way, apologies about the iPhone quality it's the only camera I own for silly step-by-step pictures. I started first by getting the pot of water to sterelize the jar(s). I have an electric stove that takes a wile to heat water to a boil. Then I started slicing the clementines. I wasn't too careful about it because I know they're gonna cook for a long time and get very soft and break up easily. After they were all sliced I put them in a pot with cold water and set them on the stove to bring to a boil. Then did that two more times. I had my sugar weighed out previously, after weighing the fruit, then added that to the pot with the fruit and a little more water to cover. After bringing it to a simmer I looked for any scum or forth to come to the surface and removed it. Then just simmered it to the right consistency. The short explanation is as follows (the most basic way of expressing it):
 dog for a long walk. Sorry Annie! What I need is some more coffee and some stuff simmering on the stove. When I know I have a good excuse to stay inside I am gonna cook, pickle, can, dry or vacuum pack anything I can. It's just in my nature! Today I stared at one of those wooden boxes of clementines on the counter and said "what am I gonna do with these things?". I know my wife will eventually eat them all but who knows when that would happen and I wanted to cook something. I had 4 more jars on the porch that needed to be filled with something and those clementines were in my crosshairs. I was thinking of making a marmelade. After all, people all over the world are harvesting citrus this time of year and making marmelade so I thought that was as good enough reason as any.
  Sorry honey we can buy more! By the way, apologies about the iPhone quality it's the only camera I own for silly step-by-step pictures. I started first by getting the pot of water to sterelize the jar(s). I have an electric stove that takes a wile to heat water to a boil. Then I started slicing the clementines. I wasn't too careful about it because I know they're gonna cook for a long time and get very soft and break up easily. After they were all sliced I put them in a pot with cold water and set them on the stove to bring to a boil. Then did that two more times. I had my sugar weighed out previously, after weighing the fruit, then added that to the pot with the fruit and a little more water to cover. After bringing it to a simmer I looked for any scum or forth to come to the surface and removed it. Then just simmered it to the right consistency. The short explanation is as follows (the most basic way of expressing it):

- First weight the fruit so you know how much sugar to use.
- Then slice the fruit. Use the pulp and skins.
- Blanch them in cold water three(3) times, starting with cold each time you change it.


- After the third blanch, add an equal amount of sugar, by weight, to the fruit and enough water to just cover.
- Simmer, skimming as froth comes to the surface, until it is of marmalade consitency.
I always use the plate method to test if is the right consistency. [Just get a plate in the fridge and when you think your marmelade is close then drop a little on the cold plate. Tilt the plate to the side and see if the marmelade sets. Also you'll be looking for the surface to make a "wrinkle" when it flows. After it's the correct consistency hot pack into jars and process.]
I also had a couple of fruit preserves in the fridge that I thought I'd have eaten by now. One was a raspberry jam and the other was from a foraged berry I picked in November called Autumn Olives. So I threw them in the microwave to get them to hot pack temperature and put
them into sterilized jars. I had enough of each to fill 1 jar each plus a little extra so I combined the teo jams together to make another full jar and processed them all. Very cool! These will probably trun into gifts for when I visit someones house or for our new neighbors but I had fun, kept busy, practiced my canning and made some room inthe refridgerator. That sounds like a pretty good way to spend a cold January morning to me.
Wednesday, January 27, 2010
Thoughts of a New Maple Syrup Season
I know it may be a bit ahead of schedule when it comes to thinking about maple tree-tapping- time, but when we're here in the dead of winter I need a little something closer to look for than Springtime. I have two maple trees in the front of my yard that I suspected were sugar maples when we first moved in. Our area is littered with them so I thought it might be possible ours were too. After a little searching online with leaf identifying templates, sure enough they were sugar maples. O.K. I thought, what do I need to make maple syrup? Again, I always want to do it myself and making maple syrup didn't seem hard. I did a little more research on how the process of making maple syrup is accomplished and as I suspected it's very easy. Here is a list of things you need to get started:
- The first week of March (in the Northeast anyways)
- Sugar maple tree(s). (There are other varieties of maple that are tapped for syrup but the sugar maple is the best.)
- A drill with a 5/16 bit.
- 5/16 maple spouts. (Depending on how many you decide to tap)
- A bucket with a lid and a 3/4 in. hole to hang it from or Sapsac set up. (I bought 3 Sapsac kits on ebay for about $40.00 with tax and shipping)
- Turkey fryer kit: Propane tank, burner, and large pot(s) or if you prefer to save a little money and use the wood from your cord outside, build a little brick setup for you to raise your pot over and make a wood fire.
That's pretty much all you need to get things going. First things first, you go to your tree with drill in hand and drill a hole about 2 in. deep slightly angled up, into the tree. Then you drive your spout into the hole and hang your bucket or Sapsac. That's it! Now all you have to do is wait. That is the hard part. You will be so excited to start cooking down and watching the sap slowly reducing to sugary goodness and turning into something that you usually pay and arm and a leg for in the grocery store . Now making maple syrup I've learned it just like reducing a stock to make a glace de viande except there is alot more reducing you have to do. WARNING: if you attempt to do it all inside be prepared to reapply your wall paper in your house! This does create so much steam it's a problem. I do mine on my side porch with the screen windows open. It's a really nice thing to do on a cold Sunday when it may be snowing again and would probably keep you in the house anyways.
There are some things to keep in mind while you are collecting your sap and trying to get enough to make syrup. I think we all know that it takes about 40 gallons of sap to make around 1 gallon of syrup. Obviously that doesn't mean you have to wait to collect all 40 gallons before you can start cooking it but you should have at least 10 to 15 gallons to give you an end result that your not disappointed in. As the days go on and you check your buckets/sacs you'll see that the sap will flow from a single drip to almost a "flow" as time goes on. While you are collecting your sap you want to make sure it's kept cold. That won't be hard if the nights are still cold and you leave it outside, covered. You just don't want to allow it to get warm because it can go "sour" fairly quickly. When you get to around 10 to 15 gallons or so start cookin'! I like to separate the sap into several pots so it cooks down faster. Another good tip is using large, wide pots. It's all about surface area people. The more surface area you have to work with the quicker it will steam off and reduce. When your 10 or 15 gallons reduces to 1 gallon then you can manage it a little better in the house. Once the sugar content begins to develop you have to be careful not to cook it too hard. If you do it could scorch or get darker than it should. One thing I like to do with the final gallon is to put it in the crock pot with the lid off and allow it to reduce very slowly either over night or even longer. I'm in no rush! As long as it takes is as long as I'll take it. So how do you know when it's done? It's easy but you need an accurate thermometer. You should know that depending on your elevation (for all you mountain folk) water boils at different temperatures. The higher the elevation the lower the boiling point. So you should check your boiling water with a thermometer where you are making your syrup. Once you have that reading your maple syrup should be done when it reaches a temperature that's 7.1F higher than the boiling point. For people like me at not much higher than sea level it will be 219.1F. When you've reached that you've hit the mark and have a "syrup" ready to use or even can.
There are some details that I have failed to mention for the sake of getting confusing and, quite frankly, long winded. I just wrote the basics that I follow and then it's up to you to enjoy the learning process on your own. I like a little direction and then I find the rest of the way myself. If you would like to know a more in depth description here is a link to the Ohio Sate University Extension program. http://ohioline.osu.edu/for-fact/0036.html
Believe me when I say anyone can make there own maple syrup. It is a very rewarding accomplishment and gives you the sense that you have gained a skill as well as maybe even built up a little more confidence. Little projects like this bring me back to a time when this was the process of how you got things in life. There were no mega-grocery stores to just have your pickings from. You knew where the tree was, how to collect sap and did what you had to do if you wanted maple syrup. The word appreciation comes to mind when you think of the process good things in life take and if you do it yourself your will certainly appreciate that maple syrup a lot more when you made it yourself than if you bought it in the store...and it will probably taste better too!
Tuesday, January 26, 2010
First Blog First Post! Part 2
O.K. I feel that I'm a very seasonal cook and find more inspiration with finding ingredients through farmers markets and foraging than any other way. You will eventually see that I am also one of those cooks that has got to find a way to do things himself no matter how difficult the task, and always on a shoestrink budget. As soon as I can hang another ham, I want to do that again. I just built my own chicken coop so I could have eggs that are fresh from the chickens ass. Thge more interesting things I come across the deeper I have to dive and figure out how I can do that myself. That's where the big learning comes in. I've carried on with my side bar a little too long. May I digress back to my dinner party.
So the salad and the lemon vinaigrette was set aside and ready to go along with the Branzini. I decided to try and cook the ribeye steak sous vide. I've never done this before but I had to give it a go. I seasoned the steak with some herbs and black pepper and vacuum sealed it up. I don't have a circulator so I had to manually circulate things. Believe me, I didn't stand there stirring the whole time I just decided to flip the steak every so often. It took me about an hour and a half to cook it. I kept the temperature about 140F and monitored it carefully. Next I blanched a pound of asparagus and set it aside for a simple sauteed asparagus side dish. I also tried a celerly root puree sous vide. (Who do I thing I am!) I peeled and diced the celery root and one small potato, placed it in the bag that went into a pot of water waiting as just above a poach and below a simmer. That ended up taking about the same time as the steak.
After our guests arrived and after a Manhatten and some wine we made motion to start getting things read to eat. I was pretty much in charge of this. So I zipped open the steaks and patted them dry so they would sear well. I opened the celery root and dumped that right into the cuisinart and pureed that. That was done. I turned on my little non-stick pancake griddle and I seasoned the fish and cooked them along with the asparagus all at once. I cooked the fillets skin side down almost the whole way and they came out beautifully. I flipped them and cooked them on the other side for a brief second and they were done. I cooked the asparagus just to give it a little color and then tossed it in whole butter and salt. One of the last things I did was sear the steak. All I had t do was get a good hot cast iron pan with a little oil and drop it in. I left it there until nice and caramelized on one side, then flipped it added butter and shallots and basted it until the other side was nicely colored. And it was perfect! Entirely uniform of doneness throughout and very beefy! I plated everything neatly but quickly so it stayed hot and then placed it on the table to eat. We quickly toasted the evening with Prosecco and ate till we felt like bursting. The dinner that evening was what having good friends and conversation, in the presence of good food, can do to make great memories and bring each other even closer together.
Sunday, January 24, 2010
First Blog First Post! Part 1
After much consideration, reading and desire to discuss all topics food I've decided that blogging could be a great outlet for my thoughts and discoveries. I'm a professionally trained cook, former chef and current culinary instructor, with a driving passion to learn more about the food and cooking. There's not many topics of discussion that are as stimulating or enriching as talking about ways of cooking or places to forage or how many generations have made the same recipe and how important that is. Many people find food and eating or dining experiences as an ice breaker for getting to know each other. Being in the culinary field for a few years now, many who that hear I'm a chef want to talk about such things as somethhing they've cooked or want me to answer a question on how to cook something. That's fun stuff! That is sort of what I hope to get out of this blog...but at a seemingly slower pace. It's quite obvious that it's a topic we all share no matter where you're from or what your cultural background is.
We had a great dinner party last night with a couple that came into town from Brooklyn. I knew I had a opportunity to try out some new things but also knew I had to be careful not to turn anyone off getting too creative or undercooking something (Do you believe there are people out there that stil don't eat their meat pink!). My wife and I went to Whole Foods and shopped for all the things we were gonna need. Starting with the meat and fish, we built the menu around the best things (and price) we saw. We found some Branzini and a big bone-in ribeye steak with a good "cap"to "eye" ratio. I'm a big fan of the cap. Branzini is not my first choice for fish but I had to make the decision and it looked like the best quality amoungst all other things in the case. Then we were off to the produce to build the rest of the menu. I picked up some grapefruit (at it's best this time of year), a couples of lemons, a fennel bulb, radishes, some shallots and a few other things for the house. I wanted to make a salad with fennel and radish, grapefruit supremes and a lemon and ginger vinaigrette. So I shave the fennel and radishes very thin on the mandoline and used some of the fennel tops for the vinaigrette. Then I tossed it all together and set it aside until later. This was for the fish. Good call! As a side note, I'm a very seasonal cook. I don't like to rack up the food miles like frequent flyer miles just so I could have it for dinner. Oops! Out of blog space! I'll continue later.
We had a great dinner party last night with a couple that came into town from Brooklyn. I knew I had a opportunity to try out some new things but also knew I had to be careful not to turn anyone off getting too creative or undercooking something (Do you believe there are people out there that stil don't eat their meat pink!). My wife and I went to Whole Foods and shopped for all the things we were gonna need. Starting with the meat and fish, we built the menu around the best things (and price) we saw. We found some Branzini and a big bone-in ribeye steak with a good "cap"to "eye" ratio. I'm a big fan of the cap. Branzini is not my first choice for fish but I had to make the decision and it looked like the best quality amoungst all other things in the case. Then we were off to the produce to build the rest of the menu. I picked up some grapefruit (at it's best this time of year), a couples of lemons, a fennel bulb, radishes, some shallots and a few other things for the house. I wanted to make a salad with fennel and radish, grapefruit supremes and a lemon and ginger vinaigrette. So I shave the fennel and radishes very thin on the mandoline and used some of the fennel tops for the vinaigrette. Then I tossed it all together and set it aside until later. This was for the fish. Good call! As a side note, I'm a very seasonal cook. I don't like to rack up the food miles like frequent flyer miles just so I could have it for dinner. Oops! Out of blog space! I'll continue later.
Subscribe to:
Comments (Atom)